


You probably might have heard about TDD and/or used it in your projects. It simply refers to a technique where you write a test that fails before you write new functional code that passes the tests.
It's a general technique in the software development lifecycle, and it's no different in React, you basically have the test cases that fail then you write your working code to make the tests pass. This pattern is popularly known in the test community as red, green, refactor (I like to call it the rgr pattern 😀).
I recently took TDD seriously while using it on an app I'm working on, and the experience I've had with this approach is just...well...better than what I used to feel. I'm able to write more modular code and spend less time debugging (for real, because who likes seeing bugs?).
In this article, we'll implement TDD in React using Jest and React Testing Library.
🤷♂️ Do I need to write tests?
This question is debatable and I'm no expert to answer that; but as a software developer that cares about their code, the answer is yes! You need to write tests.
If there's one reason I can present to you, it's that you are more confident in the code you write.
Let's say you have an xyz app and your boss says hey we need to get feature foo up and running. Because this feature has little requirement you were so quick with the implementation; Voila!
You didn't bother testing the existing features because the app is large and QA would take forever; it is just a small feature you thought and hoped that it will work.
But, to your surprise existing features like bar stopped working because feature foo introduced a middleware that prevented blah blah...and you spent hours debugging...and the rest is story (You get the point?).
The more your tests resemble the way your software is used, the more confidence they can give you. - Kent C. Dodds
We can go on and on to discuss the reasons why TDD is so important, but good developers know that writing tests show that they care a lot about their code and want to confidently ship quality code.
Alright, let's not forget why we're here.
🛠 Installation and setup
First things first, we'll to create a counter app using create-react-app. I'm assuming you're not a noob and have the basic tools like npm or yarn (whichever you prefer) on your computer and at least have basic knowledge of JavaScript and React.
With that being said, clone the starter project and skip this section or follow the steps below to create a new app:
- Run
npx create-react-app react-counter-test. - Run
cd react-counter-test. - Once you're in the app, run
npm startto start the app on development mode. - If everything goes well, you should be able to open localhost:3000 to view it in the browser.
NB: Keep in mind create-react-app uses Jest as its test runner.
🚨 Writing the test case (Red)?
Inside the src directory of our app, you should see an App.test.js file; test files in JavaScript usually end with .test.js or .spec.js (something to keep in mind).
Typically, you would want to create a __test__ directory inside each component you are testing, anyways it's up to you.
To start with replace the code in App.js with:
import "./App.css";

function App() {

  return (
    <div className="App">
    </div>
  );
}

export default App;
Then proceed to write the tests in the App.test.js file:
import { fireEvent, render, screen } from "@testing-library/react";
import App from "./App";

describe("Counter", () => {
  it("should increase when the increment button in clicked", () => {
    render(<App />);

    const button = screen.getByText(/increase/i);
    fireEvent.click(button);

    const paragraph = screen.getByTestId("counter");
    expect(paragraph).toHaveTextContent(/1/i);
  });

  it("should decrease when the decrement button in clicked", () => {
    render(<App />);

    const button = screen.getByText(/decrease/i);
    const paragraph = screen.getByTestId("counter");

    fireEvent.click(button);
    expect(paragraph.textContent).toBe("-1");
  });
});
Before we run our tests let me briefly explain what's going on:
- We created a block using
describeto group our related tests together. - Now we run a test. Jest allows us to do this using the
testmethod (you can also useitwhich is an alias ); they both accept aname,function, andtimeout. - Render the component, in this case
<App />. - Find the button by querying it with the text, a better approach might be to query it using the role and its accessible name:
const button = screen.getByRole("button", { name: /decrease/i });. - We query the paragraph element using the
data-testid. Using thedata-*attribute is an "escape hatch" to quer DOM elements. - Click the button by firing an event, the
fireEventdoes the magic - it dispatches an event on an element. - Finally, we make our assertion to check if the paragraph element content is 1 when the increment button is clicked and -1 when the decrement button is clicked.
Alright, we can run our tests by running npm run test or npm run t on the terminal. As expected, our tests fail:
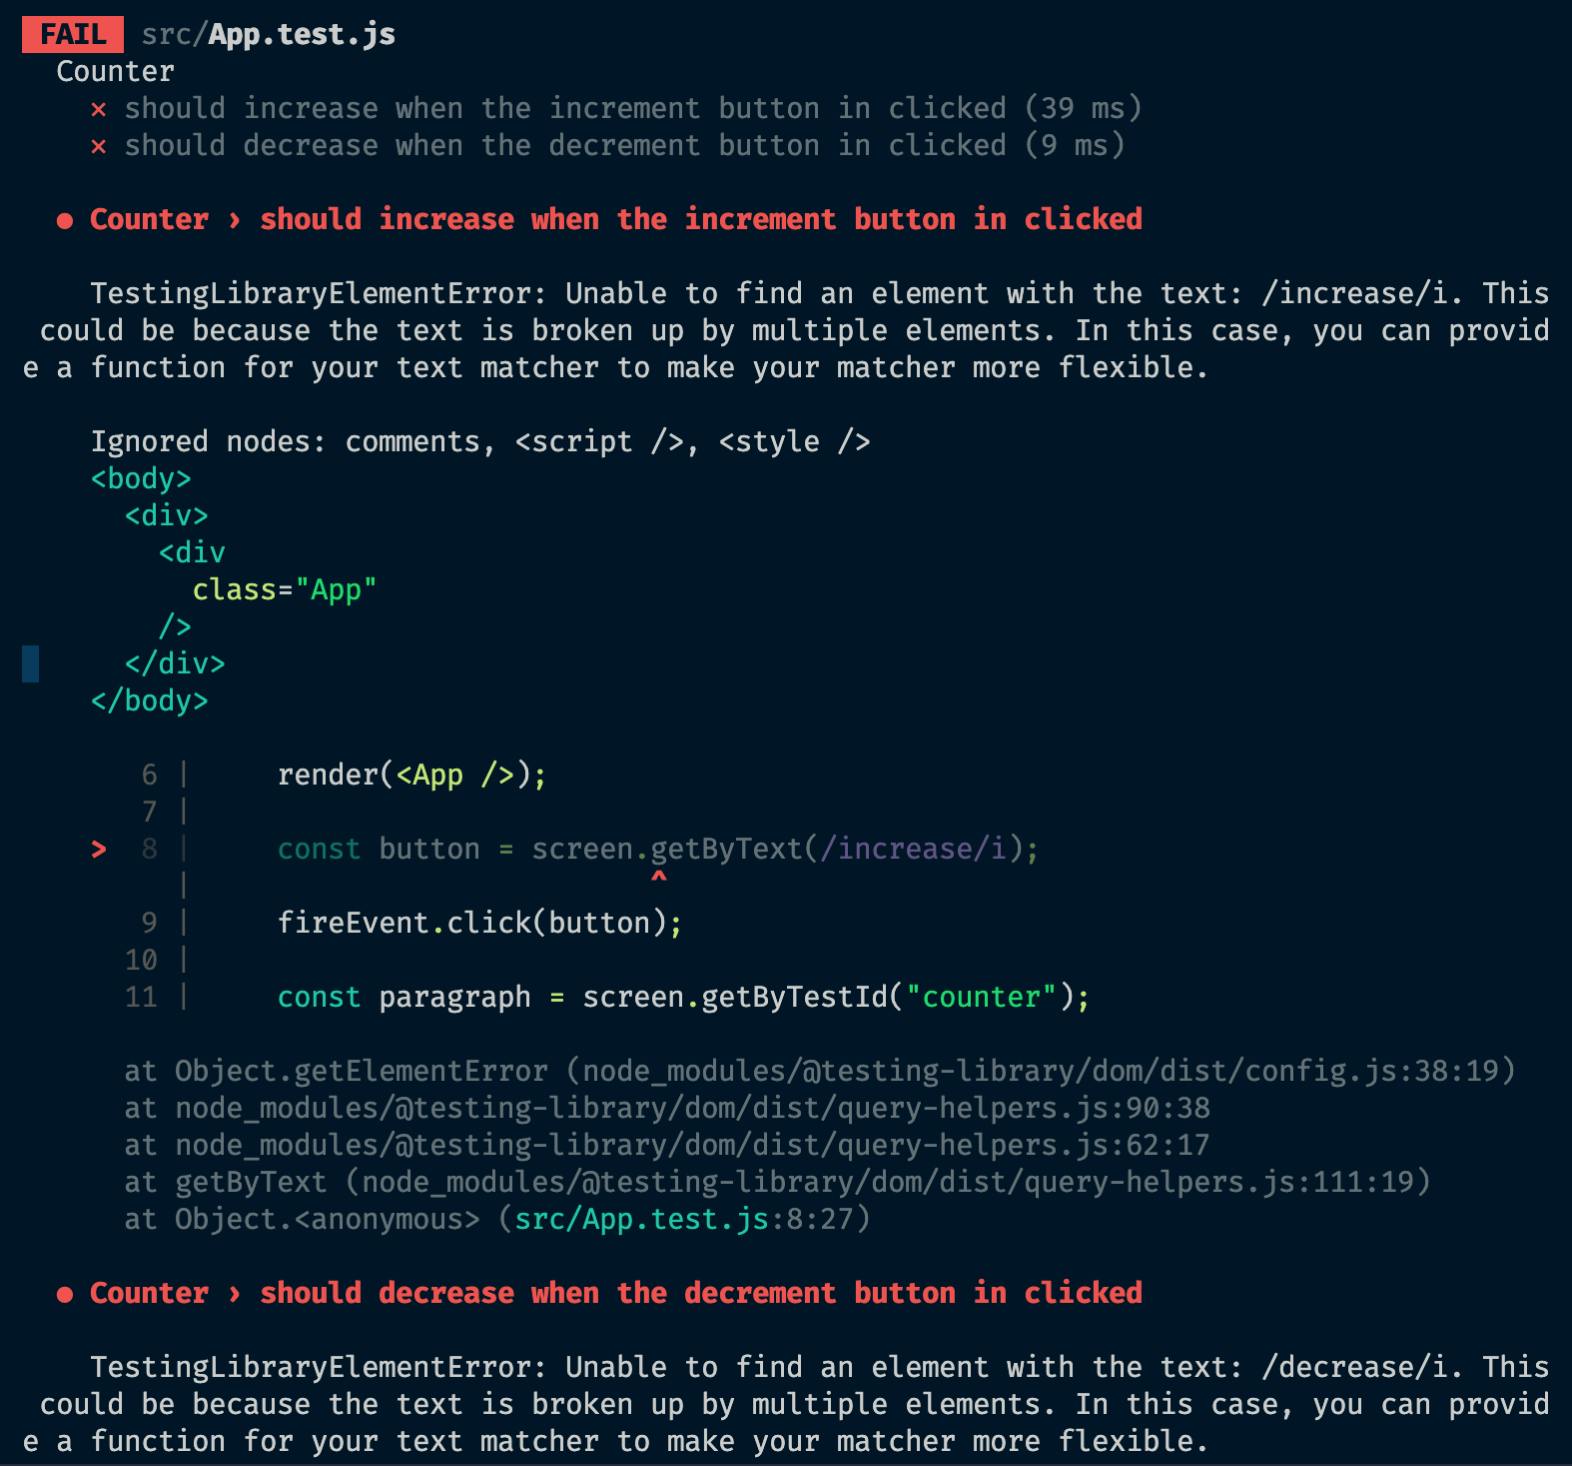
Why is that 🤔? Well, our tests expect that when the buttons are clicked the paragraph text displays the expected content.
However, if we look at the code inside App.js; the error is obvious - there are no buttons with the text 'increase' or 'decrease'; which is why our test fails.
✅ Let there be green!
Enough of the red, let's see some green, open the App.js file and replace with:
import { useState } from "react";
import "./App.css";

function App() {
  const [number, setNumber] = useState(0);
  return (
    <div className="App">
      <button onClick={() => setNumber(number - 1)}>Decrease</button>
      <p data-testid="counter">{number}</p>
      <button onClick={() => setNumber(number + 1)}>Increase</button>
    </div>
  );
}

export default App;
Voila! Our code passes the test.
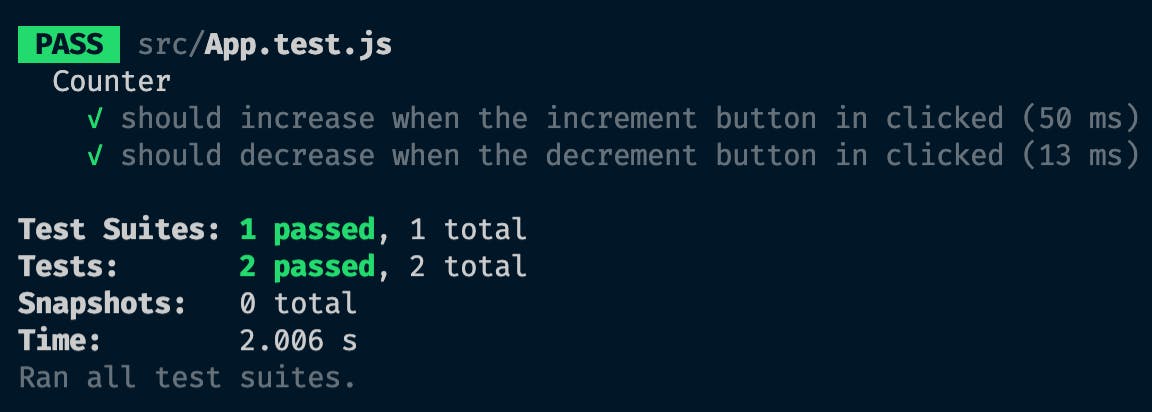
What happened? We simply attached a click event handler to the button and our setNumber handles the increment and decrement functionality. So when the tests are run and the buttons are clicked on; the expected (tests) values match what is received (the code).
You can check the working code if you encounter any issues following the steps.
🔁 Refactor
This is the final part of the rgr pattern, at this point you look over the code and refactor or do a cleanup; the best part is that you already have a test so if anything fails while refactoring you're notified.
On your own, try changing the code on App.js. What if you increment by 2? How about using the double click handler?
✍️ Conclusion
One might still wonder about the purpose of these tests. I mean anyone can just write the working code and just test that they work? But keep in mind that writing tests do not replace manual testing; it just speeds things up a little bit; remember the xyz scenario - we wouldn't have pushed a buggy code if we followed the TDD approach because our tests would specify and validate the code.
This idea might seem counter-intuitive, but it's super productive; I'm not saying write tests for every code you write however, consider writing tests if:
- you care about your code - writing quality code
- you like to catch bugs early - the TDD approach does not error-proof your code, contrary to that it identifies errors in a shorter timeframe
- you intend to maintain the code for a long term
- you are a software engineer 😎
Take home
- Write tests before implementing any functionality.
- Develop the actual code i.e get both old and new test cases to pass.
- Refactor. Clean it - restructure files/directories, better variable names, memoize functional components, etc without affecting the behaviour of the app.
So that's it if you find the article interesting feel free to follow me as I would be writing more on TDD.
Au revoir! ✋
📖 Resources
Here are some resources if you would like to learn more about TDD and what developers are saying about it:
- Test-Driven Development - Kent C. Dodds
- React Testing Library - Net Ninja
- When I follow TDD - Kent C. Dodds
- TDD/Unit Test advantages? - Reddit
- Should I write unit test for everything? - StackOverflow